In his article Windows Internals: Dissecting Secure Image Objects – Part 1, Connor McGarr investigated Secure Image Objects, as a prelude to a deeper investigation into how securekernel.exe and ntoskrnl.exe work together to support the Kernel Control Flow Guard (Kernel CFG) feature. Finding the topic fascinating and the article very well-written, I decided to follow in his footsteps, taking advantage of the JTAG-enabled debug and trace features available within SourcePoint WinDbg.
In the third paragraph of his 37-minute blog, Connor says “Given the lack of debugging capabilities for securekernel.exe…” and later in the article, “Although performing dynamic analysis on the Secure Kernel is difficult…”. That’s a challenge if I ever heard one! Connor dives deep into the topic, and I won’t be able to cover and elaborate on all aspects of his analysis in this blog post; I’ll continue with future short blogs covering some of the simpler aspects. Connor himself admits that this is a very complex topic, and there’s very little public information out there. The subject is very broad, and some of it will be covered as well at the upcoming REcon conference, where Andrea Allievi and Satoshi Tanda will present Hypervisor-enforced Paging Translation – The end of non data-driven Kernel Exploits? But, in the meantime, I’ll try to shed some light on what my investigations have revealed.
Let’s get started first by looking at the code involved in the creation of a Secure Image. Reading Connor’s article, and some of my earlier blogs in this series, will be very helpful in explaining some of the background.
Just like a syscall is used to transition from user mode to kernel mode, a vmcall is used to transition from the Guest (NTOS – the Windows kernel in the “Normal World”, or VTL 0) to the underlying VMM – the Hyper-V hypervisor, and from there into the Secure Kernel. The NT function nt!VslpEnterIumSecureMode is a wrapper for emitting the vmcall; and the caller of nt!VslpEnterIumSecureMode is responsible for invoking a Secure System Call. As an example, the function nt!VslCreateSecureImageSection is one of the many functions in NTOS that results in a call to nt!VslpEnterIumSecureMode. So, let’s see that in action.
First we need to enter VTL 0 NTOS by transitioning through the three VM Launch breakpoints (as outlined in prior blogs in this series); this lands you in the Secure Kernel, for which there are public symbols available. By looking in the SourcePoint Symbols window, you can see some of the functions and code associated with those discussed in Connor’s article, among them:
securekernel!IumInvokeSecureService
securekernel!SkmmCreateSecureImageSection
securekernel!SkmmMapDataTransfer
securekernel!SkmiPopulateImagePrototypes
securekernel!SkmiDeleteImage
securekernel!SkobCreateHandle
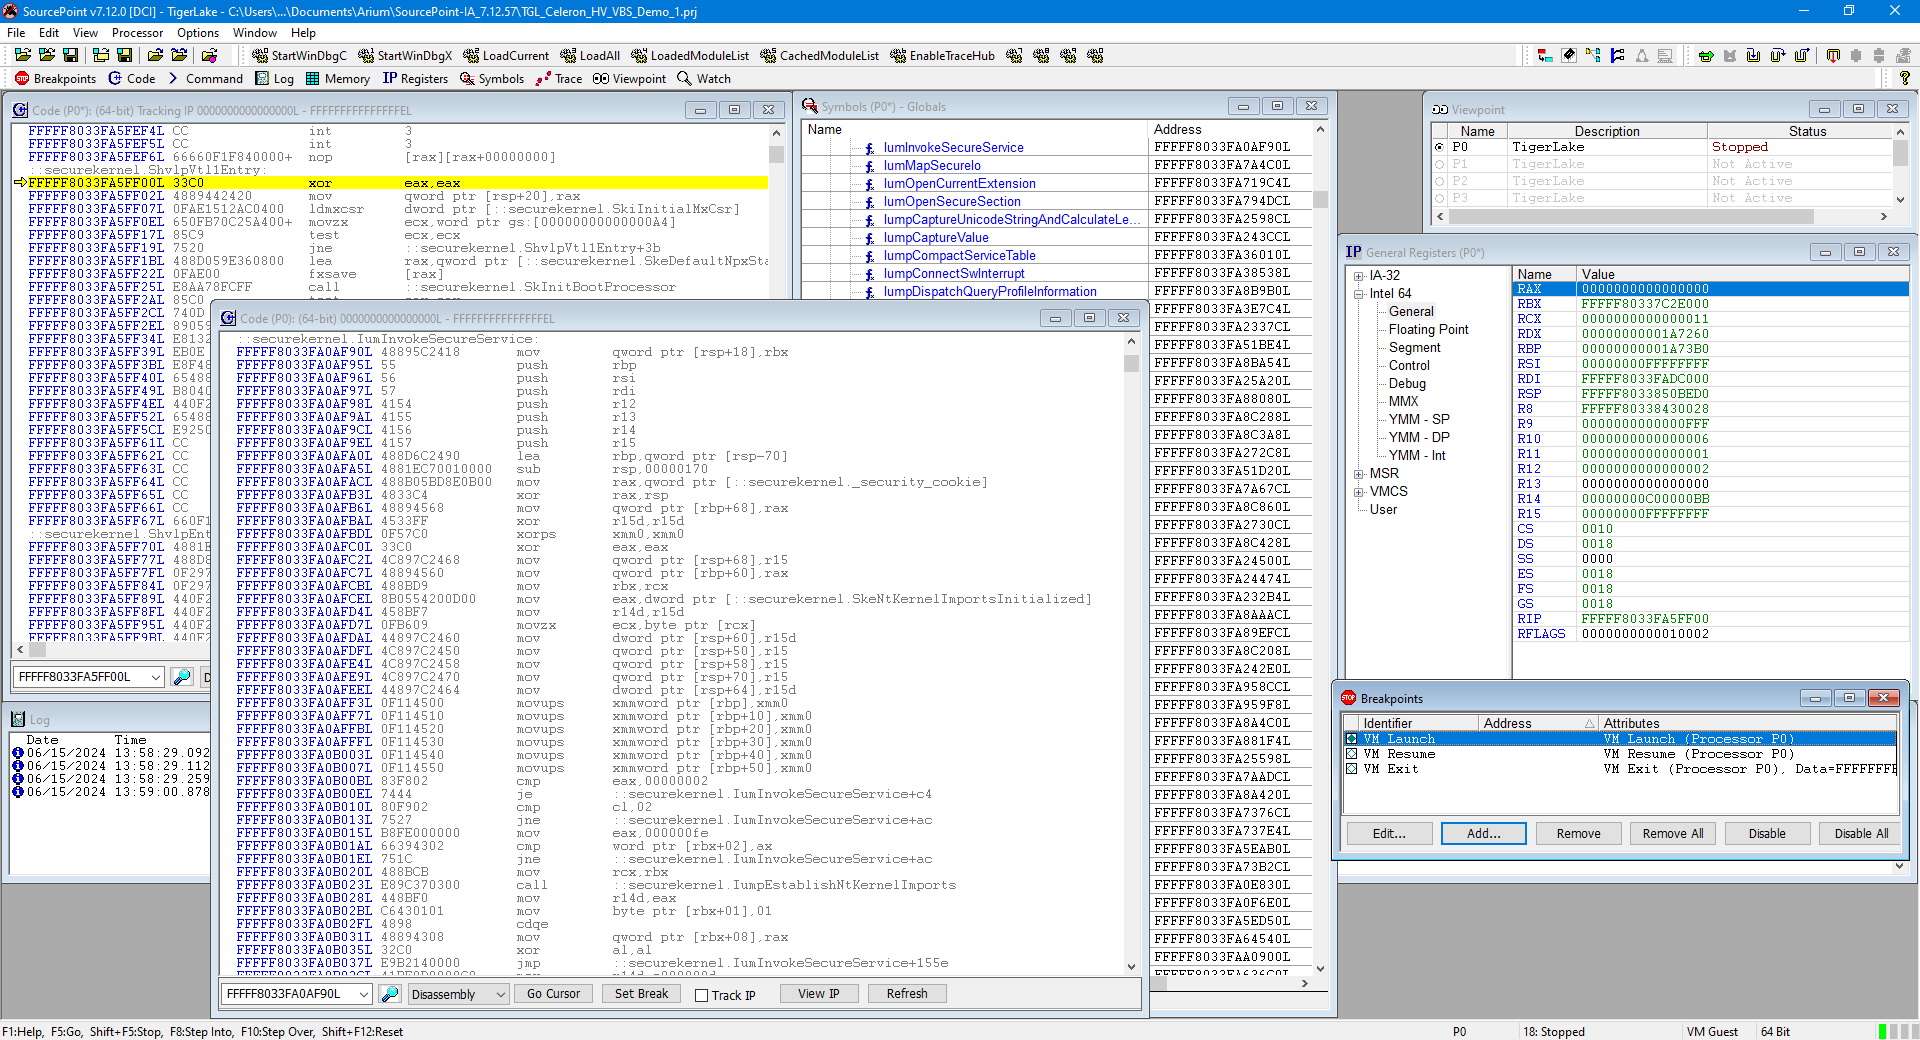
Below is a screenshot of SourcePoint displaying its Code window at the entry point to securekernel.ShvlpVtl1Entry (where the current instruction is highlighted in yellow); some of the symbols within the Secure Kernel; and a “Tracking Code” window that displays some of securekernel!IumInvokeSecureService, as an example:
We’ll come back to how some of these functions are used later.
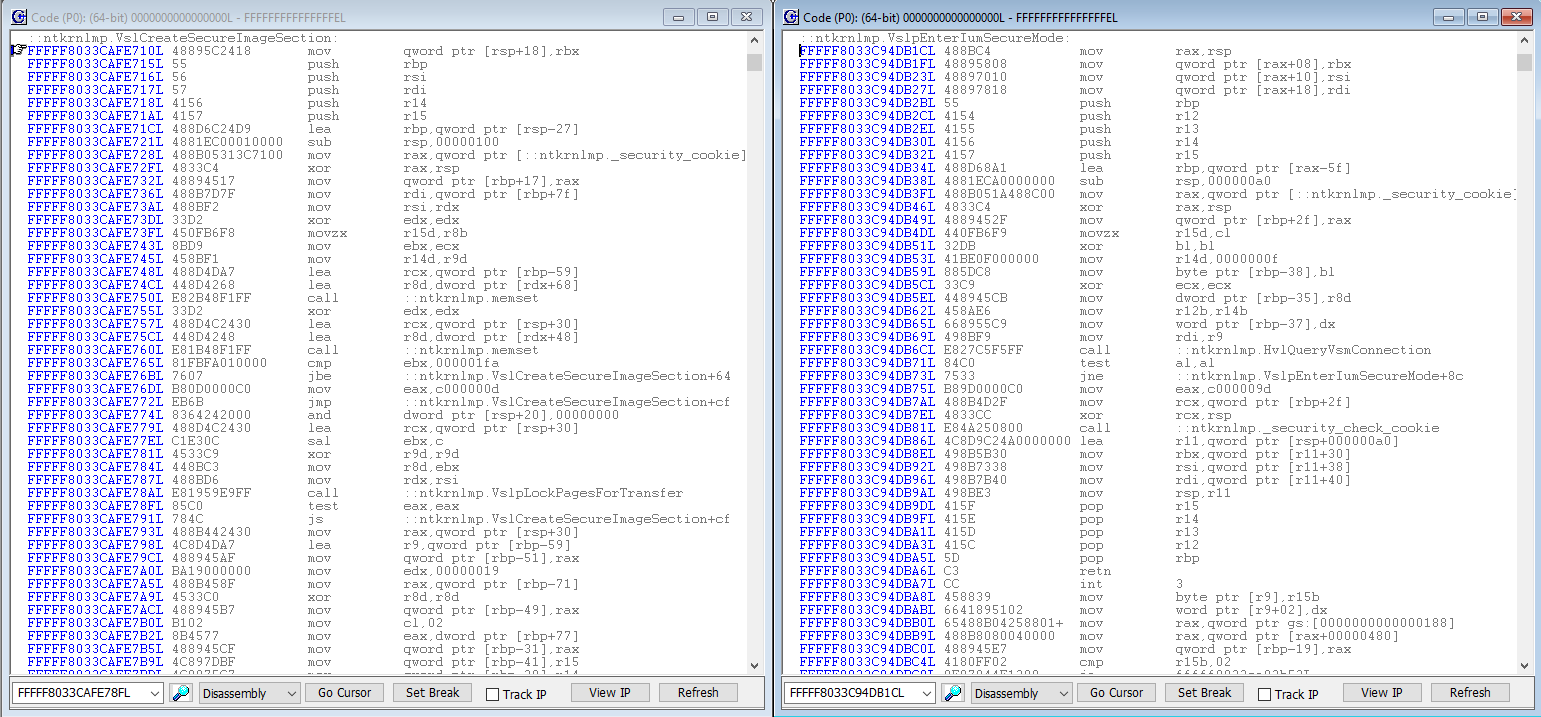
After that, to see how nt!VslCreateSecureImageSection or other code results in a call to nt!VslpEnterIumSecureMode, we need first to land in the NT kernel. There are several ways to do this, but just hitting “Go” and letting the target boot to the Windows desktop, then issuing a JTAG halt will do it. Some of the code within nt!VslCreateSecureImageSection and nt!VslpEnterIumSecureMode can be seen below:
Zeroing in on the code that leads up to the direct CALL to ntkrnlmp!VslpEnterIumSecureMode from within nt!VslCreateSecureImageSection, you can see that it’s identical to that in Connor’s article, where the x’19 (subject of the MOV EDX, 19) is the SSCN (Secure System Call Number), which is later correlated to a specific dispatch function handler:
There are a lot of things to demonstrate here, but I think the coolest thing is to show off Intel Processor Trace. We’ll capture all of the instruction trace data leading in to the entry to nt!VslpEnterIumSecureMode.
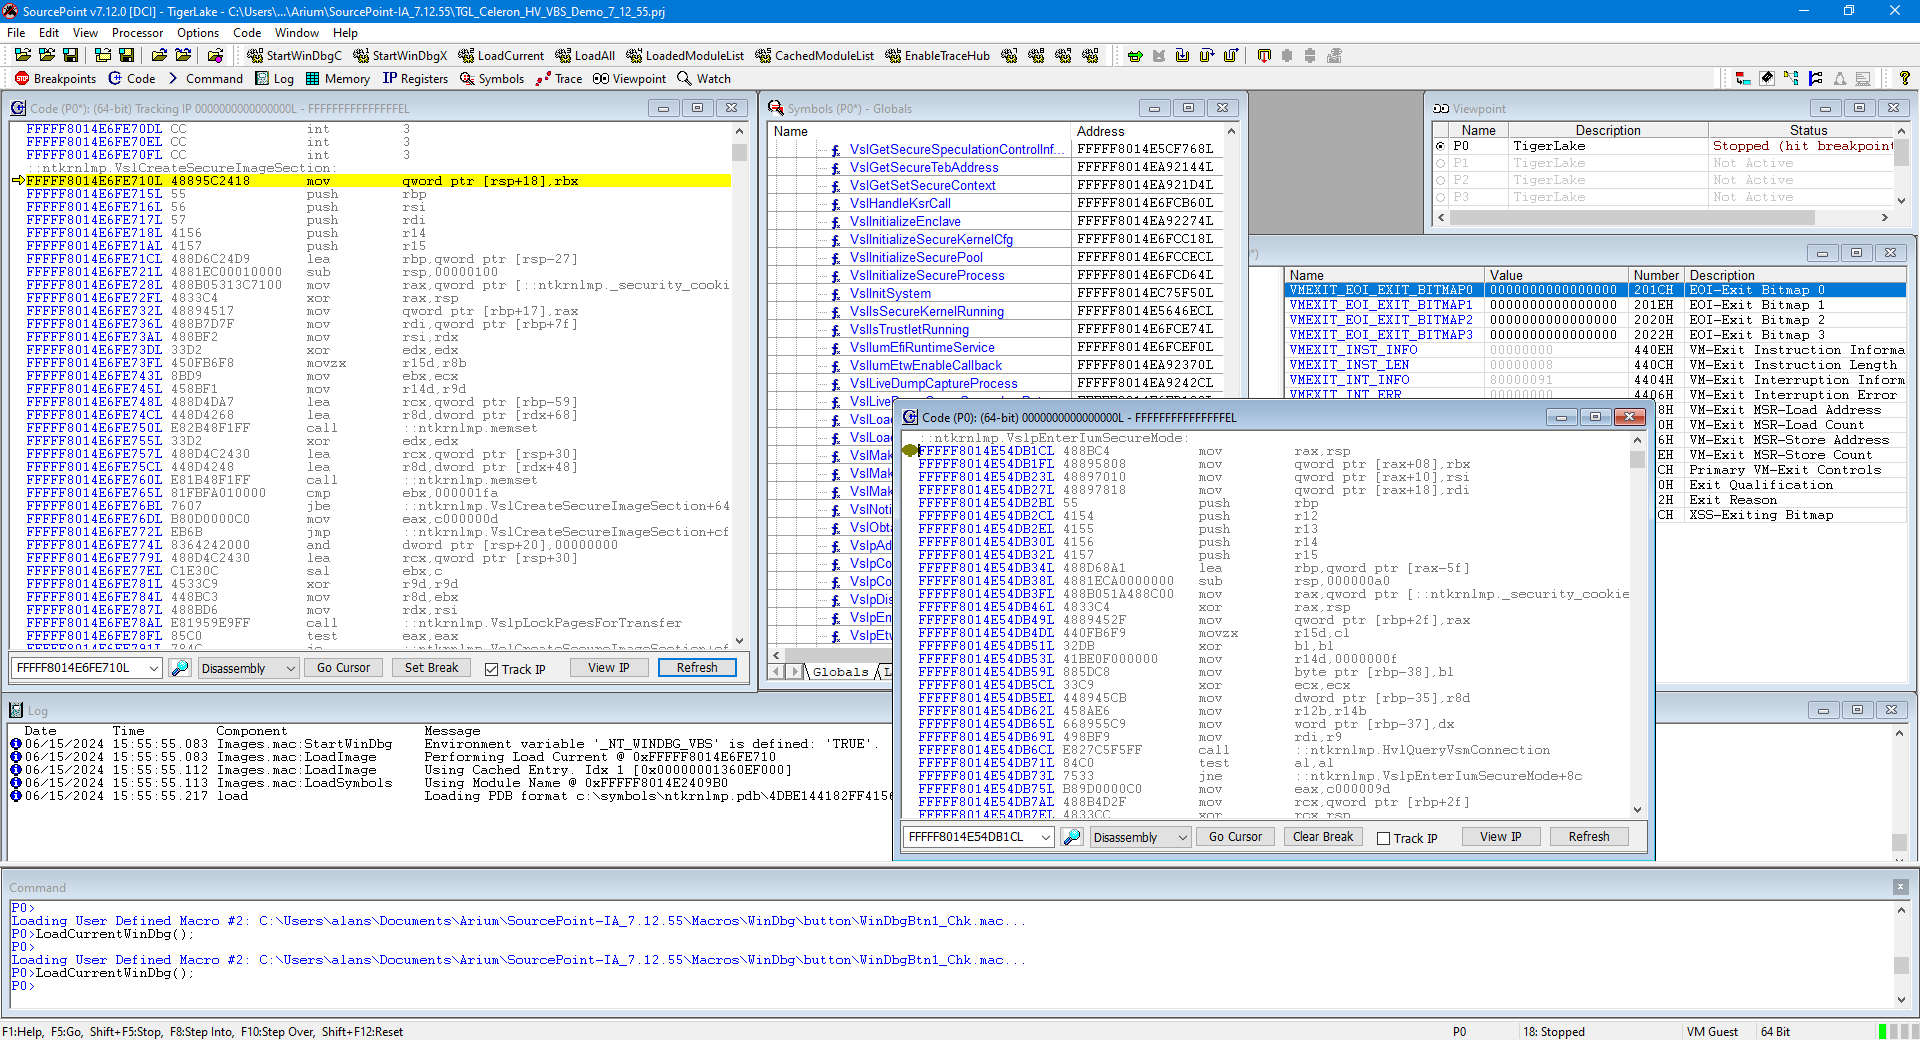
First, put a breakpoint at nt!VslCreateSecureImageSection, and hit Go. It will land at the entry point. Then open up a Tracking Code window for nt!VslpEnterIumSecureMode, and set a breakpoint there:
Turn on Intel PT, and hit Go. The target breaks at the entry point. And below is an excerpt of the traceback code leading up to nt!VslpEnterIumSecureMode (of course, in real life, you’ll collect a lot more execution trace; I’ve kept this to a minimum in the interest of space in this text):
-00665 P0     FFFFF802266043B2 test        eax,eax                                               -76.455 ns
       P0     FFFFF802266043B4 jne         fffff802266043bdL
       P0     FFFFF802266043BD lea         rcx,[rsp+20]
       P0     FFFFF802266043C2 mov         r10,[fffff80226660128]
       P0     FFFFF802266043C9 call        ::ntkrnlmp.VslExchangeEntropy
       P0     FFFFF8022399AB30 mov         [rsp+10],rbx
       P0     FFFFF8022399AB35 push        rdi
       P0     FFFFF8022399AB36 sub         rsp,000000a0
       P0     FFFFF8022399AB3D mov         rax,[::ntkrnlmp._security_cookie]
       P0     FFFFF8022399AB44 xor         rax,rsp
       P0     FFFFF8022399AB47 mov         [rsp+00000090],rax
       P0     FFFFF8022399AB4F xor         edx,edx
       P0     FFFFF8022399AB51 mov         rdi,rcx
       P0     FFFFF8022399AB54 lea         rcx,[rsp+20]
       P0     FFFFF8022399AB59 lea         r8d,[rdx+68]
       P0     FFFFF8022399AB5D call        ::ntkrnlmp.memset
       P0     FFFFF80223A12F80 mov         rax,rcx
       P0     FFFFF80223A12F83 cmp         r8,00000008
       P0     FFFFF80223A12F87 jc          ::ntkrnlmp.memset+50
       P0     FFFFF80223A12F89 movzx       dx,dl
       P0     FFFFF80223A12F8C mov         r9,0101010101010101
       P0     FFFFF80223A12F96 imul        rdx,r9
       P0     FFFFF80223A12F9A cmp         r8,0000004f
       P0     FFFFF80223A12F9E jnc         ::ntkrnlmp.memset+70
       P0     FFFFF80223A12FF0 movd        xmm0,edx
       P0     FFFFF80223A12FF5 movlhps     xmm0,xmm0
       P0     FFFFF80223A12FF8 movups      [rcx],xmm0
       P0     FFFFF80223A12FFB add         r8,rcx
       P0     FFFFF80223A12FFE add         rcx,00000010
       P0     FFFFF80223A13002 and         rcx,fffffff0
       P0     FFFFF80223A13006 sub         r8,rcx
       P0     FFFFF80223A13009 mov         r9,r8
       P0     FFFFF80223A1300C shr         r9,7
       P0     FFFFF80223A13010 je          ::ntkrnlmp.memset+c1
       P0     FFFFF80223A13041 mov         r9,r8
       P0     FFFFF80223A13044 shr         r9,4
       P0     FFFFF80223A13048 je          ::ntkrnlmp.memset+dc
       P0     FFFFF80223A1304A nop         [rax][rax]
       P0     FFFFF80223A13050 movups      [rcx],xmm0
       P0     FFFFF80223A13053 add         rcx,00000010
       P0     FFFFF80223A13057 dec         r9
       P0     FFFFF80223A1305A jne         ::ntkrnlmp.memset+d0
-00662 P0     FFFFF80223A13050 movups      [rcx],xmm0                                            -38.060 ns
       P0     FFFFF80223A13053 add         rcx,00000010
       P0     FFFFF80223A13057 dec         r9
       P0     FFFFF80223A1305A jne         ::ntkrnlmp.memset+d0
       P0     FFFFF80223A13050 movups      [rcx],xmm0
       P0     FFFFF80223A13053 add         rcx,00000010
       P0     FFFFF80223A13057 dec         r9
       P0     FFFFF80223A1305A jne         ::ntkrnlmp.memset+d0
       P0     FFFFF80223A13050 movups      [rcx],xmm0
       P0     FFFFF80223A13053 add         rcx,00000010
       P0     FFFFF80223A13057 dec         r9
       P0     FFFFF80223A1305A jne         ::ntkrnlmp.memset+d0
       P0     FFFFF80223A13050 movups      [rcx],xmm0
       P0     FFFFF80223A13053 add         rcx,00000010
       P0     FFFFF80223A13057 dec         r9
       P0     FFFFF80223A1305A jne         ::ntkrnlmp.memset+d0
       P0     FFFFF80223A1305C and         r8,0000000f
       P0     FFFFF80223A13060 je          ::ntkrnlmp.memset+e8
-00654 P0     FFFFF80223A13062 movups      [rcx][r8-10],xmm0                                     -13.688 ns
       P0     FFFFF80223A13068 retn
-00648 P0     FFFFF8022399AB62 mov         r8d,00000040                                          -12.353 ns
       P0     FFFFF8022399AB68 lea         rcx,[rsp+30]
       P0     FFFFF8022399AB6D mov         rdx,rdi
       P0     FFFFF8022399AB70 call        ::ntkrnlmp.memcpy
       P0     FFFFF80223A12CC0 mov         rax,rcx
       P0     FFFFF80223A12CC3 cmp         r8,00000008
       P0     FFFFF80223A12CC7 jc          ::ntkrnlmp.memmove+40
       P0     FFFFF80223A12CC9 cmp         r8,00000010
       P0     FFFFF80223A12CCD ja          ::ntkrnlmp.memmove+20
       P0     FFFFF80223A12CE0 cmp         r8,00000020
       P0     FFFFF80223A12CE4 ja          ::ntkrnlmp.memmove+80
       P0     FFFFF80223A12D40 lea         r11,[rdx][r8]
       P0     FFFFF80223A12D44 sub         rdx,rcx
       P0     FFFFF80223A12D47 jnc         ::ntkrnlmp.memmove+92
       P0     FFFFF80223A12D52 movups      xmm0,[rcx][rdx]
       P0     FFFFF80223A12D56 add         rcx,00000010
       P0     FFFFF80223A12D5A test        cl,0f
       P0     FFFFF80223A12D5D je          ::ntkrnlmp.memmove+b1
       P0     FFFFF80223A12D71 add         r8,rax
       P0     FFFFF80223A12D74 sub         r8,rcx
       P0     FFFFF80223A12D77 mov         r9,r8
       P0     FFFFF80223A12D7A shr         r9,6
       P0     FFFFF80223A12D7E je          ::ntkrnlmp.memmove+12f
-00646 P0     FFFFF80223A12DEF mov         r9,r8                                                 -10.016 ns
       P0     FFFFF80223A12DF2 shr         r9,4
       P0     FFFFF80223A12DF6 je          ::ntkrnlmp.memmove+151
       P0     FFFFF80223A12DF8 nop         [rax][rax+00000000]
       P0     FFFFF80223A12E00 movaps      [rcx-10],xmm0
       P0     FFFFF80223A12E04 movups      xmm0,[rcx][rdx]
       P0     FFFFF80223A12E08 add         rcx,00000010
       P0     FFFFF80223A12E0C dec         r9
       P0     FFFFF80223A12E0F jne         ::ntkrnlmp.memmove+140
       P0     FFFFF80223A12E00 movaps      [rcx-10],xmm0
       P0     FFFFF80223A12E04 movups      xmm0,[rcx][rdx]
       P0     FFFFF80223A12E08 add         rcx,00000010
       P0     FFFFF80223A12E0C dec         r9
       P0     FFFFF80223A12E0F jne         ::ntkrnlmp.memmove+140
       P0     FFFFF80223A12E00 movaps      [rcx-10],xmm0
       P0     FFFFF80223A12E04 movups      xmm0,[rcx][rdx]
       P0     FFFFF80223A12E08 add         rcx,00000010
       P0     FFFFF80223A12E0C dec         r9
       P0     FFFFF80223A12E0F jne         ::ntkrnlmp.memmove+140
       P0     FFFFF80223A12E11 and         r8,0000000f
       P0     FFFFF80223A12E15 je          ::ntkrnlmp.memmove+165
-00644 P0     FFFFF80223A12E25 movaps      [rcx-10],xmm0                                              +0 ns
       P0     FFFFF80223A12E29 retn
Interesting! There’s a lot more to show. We could trace the vmcall back into hvix64. Decompile the processor trace. Or just keep following Connor’s blog. Lots of choices. But unlike Connor, I enjoy writing shorter blogs. 🙂 I’ll continue to plow through his article and share further insights; stay tuned!


