SourcePoint Intel Help
Table of Contents
- Using Help
- Contacting ASSET InterTech
- Introduction to SourcePoint
- SourcePoint Environment
- SourcePoint Overview
- SourcePoint Parent Window Introduction
- SourcePoint Icon Toolbar
- File Menu
- File Menu - Project Menu Item
- File Menu - Layout Menu Item
- File Menu - Program Menu Item
- File Menu - Macro Menu Item
- File Menu - Print Menu Items
- File Menu - Update Emulator Flash Menu Item
- File Menu - Program Target Device Menu Item
- File Menu - Other Menu Items
- Edit Menu
- View Menu
- Processor Menu
- Options Menu
- Options Menu - Preferences Menu Item
- Options Menu - Target Configuration Menu Item
- Options Menu - Load Target Configuration File Menu Item
- Options Menu - Save Target Configuration File Menu Item
- Options Menu - Emulator Configuration Menu Item
- Options Menu - Emulator Connection Menu Item
- Options Menu - Emulator Reset Menu Item
- Options Menu - Confidence Tests Menu Item
- Window Menu
- Help Menu
- How To -- SourcePoint Environment
- Add Emulator Connections
- Configure Custom Macro Icons
- Configure Autoloading Macros
- Display Text on the Icon Toolbar
- Edit Icon Groups to Customize Your Toolbars
- Modify a Defined Memory Region
- Refresh SourcePoint Windows
- Save a Program
- Start SourcePoint With Command Line Arguments
- Use the New Project Wizard
- Verify Emulator Network Connections
- SourcePoint Overview
- Breakpoints Window
- Breakpoints Window Overview
- How To - Breakpoints
- Code Window
- Command Window
- Command Window Overview
- Confidence Tests Window
- Confidence Tests Window Overview
- Descriptors Tables Window
- Descriptors Tables Window Overview
- How To - Descriptors
- Devices Window
- Devices Window Overview
- How To - Devices Window
- Log Window
- Log Window Overview
- Memory Window
- Memory Window Overview
- How To - Memory Window
- Page Translation Window
- Page Translation Windows Overview
- PCI Devices Window
- PCI Devices Window Overview
- How To - PCI Devices Window
- Registers Window
- Registers Window Overview
- How To - Registers
- Symbols Windows
- Symbols Window Overview
- How To - Symbols Window
- Trace Window
- Trace Window Overview
- How To - Trace Window
- Advanced
- Viewpoint Window
- Viewpoint Window Overview
- Watch Window
- Watch Window Overview
- How To - Watch Window
- Technical Notes
- Descriptor Cache: Revealing Hidden Registers
- UEFI Framework Debugging
- Memory Casting
- Microsoft PE Format Support in SourcePoint
- Multi-Clustering
- Python/CScripts
- OpenIPC Integration, Installation and Usage
- Registers Keyword Table
- SourcePoint Licensing
- Stepping
- Symbols Textsym Format
- Target Configuration
- Using Bookmarks
- Which Processor Is Which
- Getting Started with DbC
- SourcePoint Command Language
- Overview
- Commands and Control Variables
- aadump
- abort
- abs
- acos
- advanced
- asin
- asm
- asmmode
- atan
- atan2
- autoconfigure
- base
- bell (beep)
- bits
- break
- breakall
- cachememory
- cause
- Character Functions
- clock
- continue
- cos
- cpubreak commands
- cpuid_eax
- cpuid_ebx
- cpuid_ecx
- cpuid_edx
- createprocess
- cscfg, local_cscfg
- csr
- ctime
- cwd
- dbgbreak commands
- defaultpath
- #define
- define
- definemacro
- deviceconfigure
- devicelist
- devicescan
- disconnect
- displayflag
- do while
- dos
- dport
- drscan
- edit
- editor
- emubreak, emuremove, emudisable, emuenable
- emulatorstate
- encrypt
- error
- eval
- evalprogramsymbol
- execution point ($)
- exit
- exp
- fc
- fclose
- feof
- fgetc
- fgets
- first_jtag_device
- flist
- flush
- fopen
- for
- forward
- fprintf
- fputc
- fputs
- fread
- fseek
- ftell
- fwrite
- getc
- getchar
- getnearestprogramsymbol
- getprogramsymboladdress
- gets
- globalsourcepath
- go
- halt
- help
- homepath
- idcode
- if
- include
- invd
- irscan
- isdebugsymbol
- isem64t
- isprogramsymbol
- isrunning
- issleeping
- issmm
- itpcompatible
- jtagchain
- jtagconfigure
- jtagdeviceadd
- jtagdeviceclear
- jtagdevices
- jtagscan
- jtagtest
- keys
- last
- last_jtag_device
- left
- libcall
- license
- linear
- list, nolist
- load
- loadbreakpoints
- loadlayout
- loadproject
- loadtarget
- loadwatches
- log, nolog
- log10
- loge
- logmessage
- macropath
- Memory Access
- messagebox
- mid
- msgclose
- msgdata
- msgdelete
- msgdr
- msgdump
- msgir
- msgopen
- msgreturndatasize
- msgscan
- msr
- num_activeprocessors
- num_all_devices
- num_devices
- num_jtag_chains
- num_jtag_devices
- num_processors
- num_uncore_devices
- openipc
- pause
- physical
- port
- pow
- print cycles
- printf
- proc
- processorcontrol
- processorfamily
- processormode
- processors
- processortype
- projectpath
- putchar
- puts
- rand
- readsetting
- reconnect
- Register Access
- reload
- reloadproject
- remove
- reset
- restart
- return
- right
- runcontroltype
- safemode
- save
- savebreakpoints
- savelayout
- savewatches
- selectdirectory
- selectfile
- shell
- show
- sin
- sizeof
- sleep
- softbreak, softremove, softdisable, softenable
- sprintf
- sqrt
- srand
- step
- stop
- strcat
- strchr
- strcmp
- strcpy
- _strdate
- string [ ] (index into string)
- strlen
- _strlwr
- strncat
- strncmp
- strncpy
- strpos
- strstr
- _strtime
- strtod
- strtol
- strtoul
- _strupr
- swbreak
- switch
- swremove
- tabs
- tan
- tapdatashift
- tapstateset
- targpower
- targstatus
- taskattach
- taskbreak, taskremove, taskdisable, taskenable
- taskend
- taskgetpid
- taskstart
- tck
- time
- uncoreconfigure
- uncorescan
- #undef
- unload
- unloadproject
- upload
- use
- verify
- verifydeviceconfiguration
- verifyjtagconfiguration
- version
- viewpoint
- vpalias
- wait
- wbinvd
- while
- windowrefresh
- wport
- writesetting
- yield
- yieldflag
Confidence Tests Window Introduction
Confidence tests are designed to provide confidence that the emulator and target are both working reliably by exercising various fundamental features of the emulator in an automated fashion. There are a number of confidence tests available in SourcePoint. The Confidence Tests window can be opened by selecting Options|Confidence Tests from the menu bar or the related icon from the toolbar.
Note: Close all windows before running any tests. Open windows may not always be updated and may display incorrect data during and after a confidence test has been run. Most tests modify the state of the target.

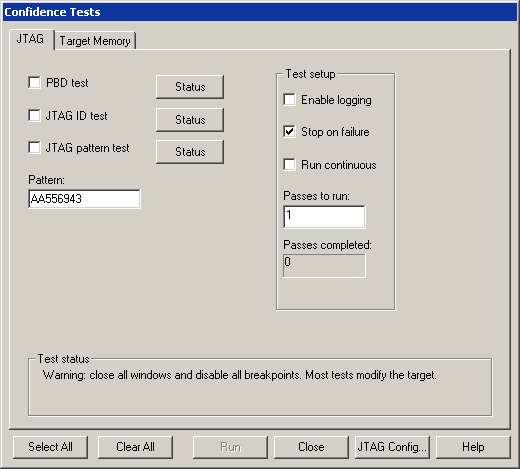
Confidence Tests dialog box
Dialog Box Overview
The tests are divided into two categories, as indicated by the tabs in the dialog box – JTAG and Target Memory. The Test Setup section at the right on each tab lets you set various options and tells you how many passes have been completed on any currently running test. The Status buttons indicate the status of a test as it runs. These are described in more detail below.
Tests and Test Status Buttons
As each test runs, the text on the associated button changes to show the progress of the testing - Pass, Fail, Skipped, or Aborted. At the end of the testing, the buttons indicate test results. Click on the corresponding button to display additional test details. If the test failed, details include the last cause of failure. For detailed information on each test, see "Confidence Tests Tabs," part of "Confidence Tests Window Overview," found under Confidence Tests Window.
Test Setup Section
Enable logging. When this option is enabled, select steps are logged (viewable in the Log window). By logging only select steps, and not all of them, tests cycle through passes at a much faster rate than in previous versions of SourcePoint.
Stop on failure. Enabled by default, this option stops the tests after the first failure.
Run continuous. When this option is enabled, the test runs continuously until the user cancels it or until it finds an failure if the Stop on failure option is enabled in the Test setup section of the dialog box.
The Passes to run option defaults to “1.” Enter the desired number of trials in the text box. As the test is performed, the iteration number appears in the text box.
Passes completed. This is not an option but a counter. As the name implies, the text box displays the number of passes the test has completed.
Reset target first. Available only on the Target Memory tab, Reset target first allows you to reset the target before running the target memory tests.
Note: Run continuous is the alternative to Passes to run, not to Stop on failure. If you enable the Run continuous option, the Passes to run option is grayed out, and vice versa. If you select Run continuous and Stop on failure, the emulator still stops on the first failure. In other words, either choose the number of passes you want to run or enable the Run continuous option.
Pop-Up Dialog Box
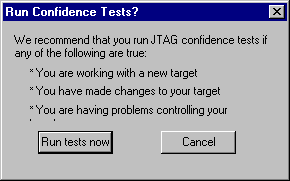
Run Confidence Tests? dialog box displays when you add or change a connection (e.g., from TCP/IP to USB) or when you change settings on the Emulator Configuration JTAG or JTAG Clock tabs. Arium encourages you to run the JTAG confidence tests at those times.

Run Confidence Tests? pop-up dialog box

